
This tutorial will walk through how to interact with Deribit’s WebSocket Interface and provide a Python example you can use!
This guide is suitable for beginners and experienced users alike!
Deribit has an API that anyone is able to interact with to receive or send requests. There are three primary interfaces of the API:
- JSON-RPC over WebSockets (WebSockets)
- JSON-RPC over HTTP (RESToverHTTP)
- FIX (Financial Information eXchange)
The JSON-RPC over WebSockets (WebSockets) interface is amazing for tasks such as:
- Receiving data from Deribit (eg. Order Book updates, Trades, etc)
- Sending requests to Deribit without having to authenticate each request (eg. Creating Orders, Canceling Orders, etc).
In this guide, we will:
- Walkthrough how to create your Deribit API Keys.
- Run the provided Python example with your Deribit API Keys.
- Discuss how the Python example works.
- Discuss ideas for what you could build with Deribit’s WebSocket interface.
This guide will use Deribit’s Testnet as so we don’t risk real capital.
To complete this guide, you will need:
- A Python environment installed on your system. Anaconda is a great place to start if you are new to Python and using Windows. If you are using macOS or Linux, you can install python directly using your terminal.
- An IDE like VSCode or Pycharm (Pycharm for Anaconda).
- A Deribit testnet account.
- The Deribit API Documentation open at all times. It is the single best resource and reference for any API question now and in the future.
1. Creating your Deribit API Keys
1. Login to your Deribit TESTNET account
If you do not have a TESTNET account, you should create one. You will need a separate account from your live Deribit account.
Make sure to never share your API Keys with anyone. API Keys are even more sensitive than your username and password & do not require 2FA before critical interactions. Best Deribit Security Practices Guide.
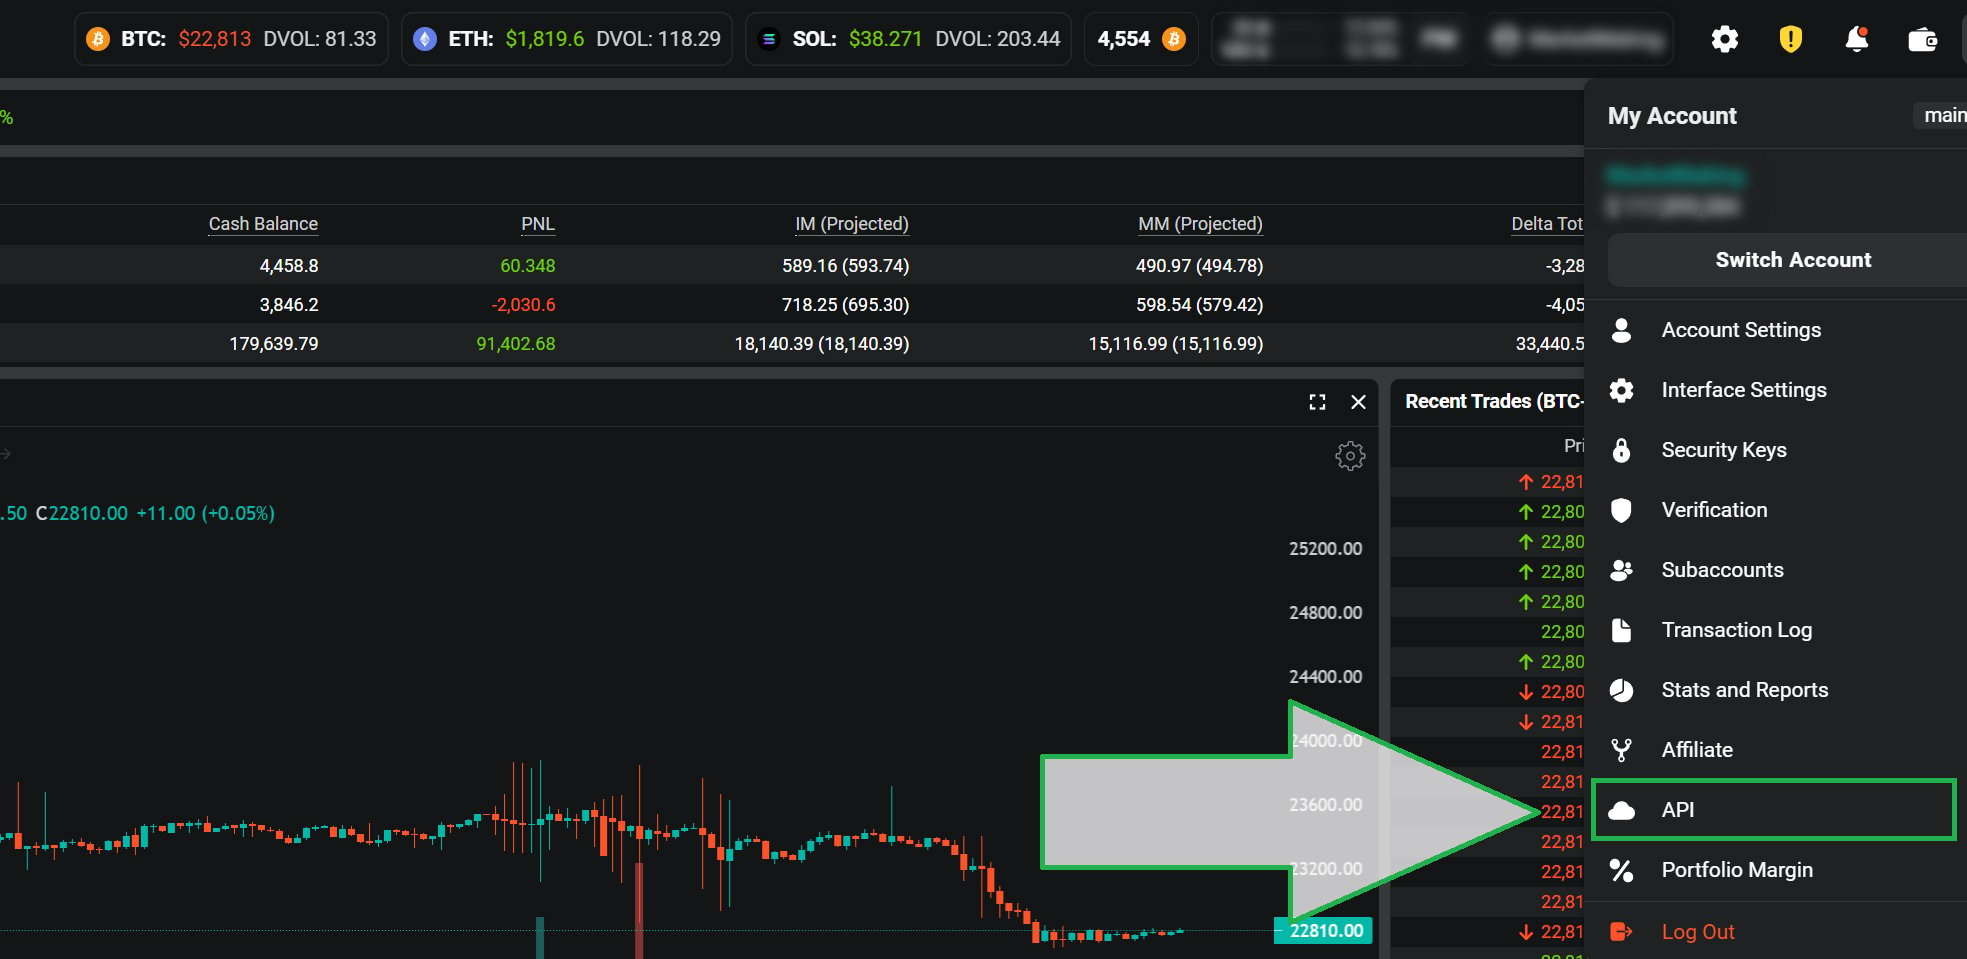
2. In the top right-hand corner of Deribit’s TESTNET, hover over the “Person” icon to reveal a dropdown menu. Click on the “API” menu item.
3. In the top right-hand corner, click “ADD NEW KEY”.

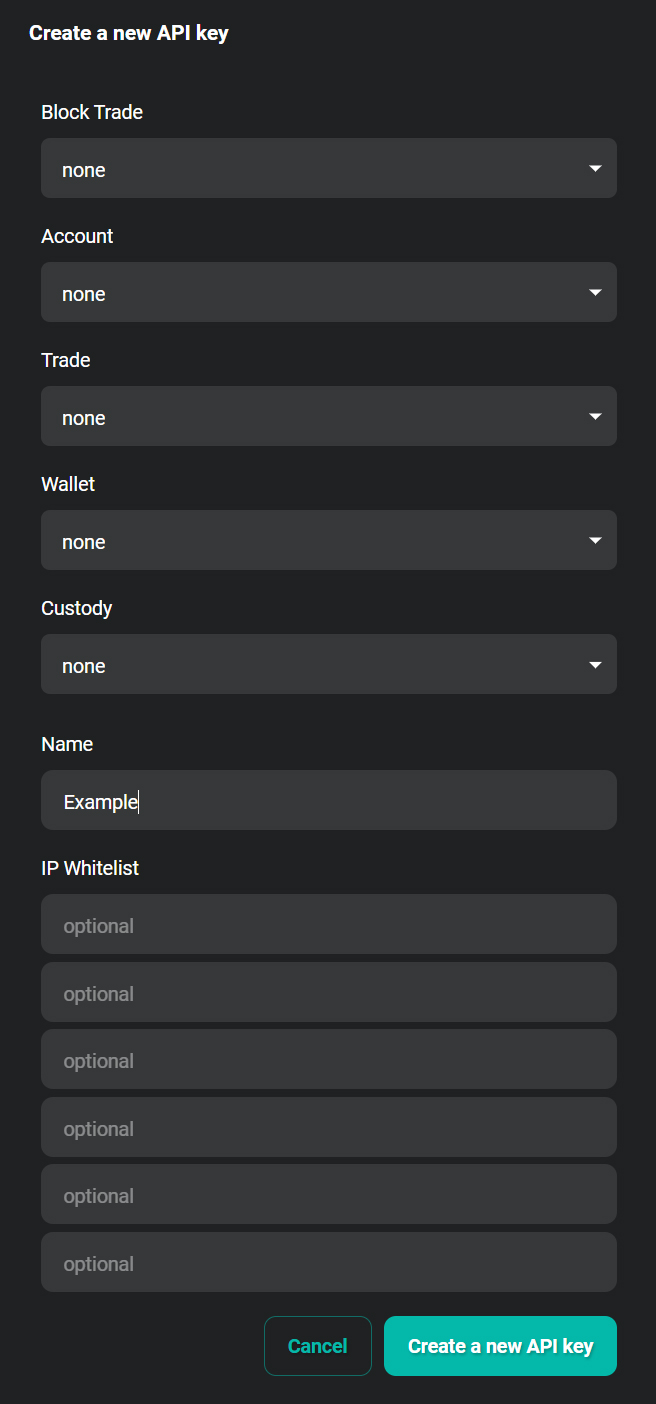
4. In the bottom right-hand corner, click “Create a new API key”.
We won’t be adding any “Scope permissions” to your Deribit API Key in this example as they are not necessary. You should only enable specific permissions to be “read” or “read_write” when absolutely necessary. Your Deribit API Credentials’ “Scope permissions” are a key part of your account’s security.
We suggest you name your created Deribit API Key something recognizable. You will be able to see the Trades in your Transaction log and the associated name of your Deribit API Key.
5. In the top right-hand corner, click “Load Keys”.
If you have two-factor authentication enabled on your Deribit account (you 100% should, maybe not TESTNET though…), you will need to enter the code to reveal your Deribit API Key(s).

6. You can now see your Deribit API Key’s “Client ID” and “Client Secret”. Note them as we will use them in the following steps.
It is strongly recommended you thoroughly test your code using the TESTNET first before using the Live exchange. Mistakes as a result of errant code using your Deribit API Key are entirely your own responsibility and cannot be reversed.

2. Run the provided Python example with your Deribit API Keys
1. Ensure that you have installed the Python package Websockets using your package manager (eg. pip, Conda).
Running something similar to `pip install websocket_client` in your IDE’s terminal will install the WebSockets package in your Python environment.
2. Copy the Python example code into the IDE on your computer (eg. VsCode or Pycharm).
The provided code is an example only and Deribit is not responsible for any actions as a result of running, using, or deploying the example.
3. Update the “client_id” and “client_secret” variables on lines 238 and 240 of your file.
4. Uncomment line 79 of your file and click “Run”. Watch as heartbeat, authentication, and “BTC-PERPETUAL” trade messages appear in your terminal as they occur.
3. Discuss how the Python example works
When connecting to Deribit’s WebSocket interface, you need to do the following:
- Establish a Heartbeat.
- Respond to Heartbeat messages Deribit sends you.
After connecting to the WebSocket interface, the code establishes the heartbeat by calling the “establish_heartbeat” coroutine to send the request to Deribit. When the WebSocket connection receives a “heartbeat” from Deribit, it responds by calling the “heartbeat_response” coroutine which also sends a request to Deribit.
It is always a good idea to authenticate your WebSocket connections with Deribit. You authenticate your WebSocket connection, in the example, by calling the “ws_auth” coroutine. In response to your request to authenticate, if successful, Deribit will return a “refresh_token” which you can use as a part of a subsequent “public/auth” request to refresh the connection’s authentication. You’ll notice you only need to refresh your connections authentication every so often and this is maintained by the instantiated “ws_refresh_auth” coroutine task.
Your WebSocket connection is now ready to make both unauthenticated & authenticated requests. On line 69, you’ll notice we request to subscribe to “trades.BTC-PERPETUAL.raw” WebSocket channel. This channel will send you every trade which occurs for the “BTC-PERPETUAL” instrument on Deribit. You can subscribe to a number of WebSocket channels and then send a payload with a “method”: “public/unsubscribe” key value to unsubscribe.
WebSocket messages will flow to you in real-time without having to make subsequent requests for this data. This is different from the RESToverHTTP interface where you make [GET] or [POST] requests to Deribit.
Another cool thing to note is that you can also make requests using your WebSocket connection in a slightly faster manner than using the RESToverHTTP interface given you have already authenticated the connection. Using your WebSocket connection, you could submit a BUY LIMIT order via requesting a payload like the “/private/buy” example in the API docs.
4. Discuss ideas for what you could build with Deribit’s WebSocket interface
Here are some ideas you could create using your WebSocket connection:
- A solution that creates and prints a summary of an Instrument’s Order Book.
- A solution that prints a message when an Instrument reaches a certain price.
- A solution that prints your accounts balance and exposure.
You could create a Trading system that submits BUY and SELL orders at certain prices. You could create a tool to send you a Telegram message when the price reaches a target. You could also create your own ability to set STOP-LOSS and TAKE-PROFIT orders for Options!
There are many other great examples on Deribit’s Dev Hub. CryptArbitrage’s example showing Deribit’s historical Perpetual Funding rates is a very cool tool!
AUTHOR(S)
We are the best resource for Crypto Derivatives trading. Deribit is not available in the United States or other restricted countries.
THANKS TO
Elliot Parker
Telegram: @ElliotPark
Twitter: @ElliotP789